Easy Pokémon Origami Bookmarks: Fun Paper Craft
Activité manuelle Pokémon avec les marque-pages rigolos, c’est parti pour une création super fun qui va ravir tous les fans de l’univers Pokémon ! Imaginez : un petit Pikachu, un Bulbasaur espiègle, ou même un Carapuce adorable, tous prêts à se glisser entre les pages de vos livres préférés. Ces marque-pages rigolos sont parfaits pour les grands débutants, les enfants dès 6 ans, et constitueront des cadeaux faits maison absolument uniques. Comptez environ 15-20 minutes pour donner vie à votre premier Pokémon en papier. Dans ce tutoriel, je vais vous guider pas à pas pour apprendre les plis essentiels de l’origami et créer ces petits compagnons de lecture avec aisance. Préparez votre feuille, on va plier ensemble et s’amuser comme des petits fous !
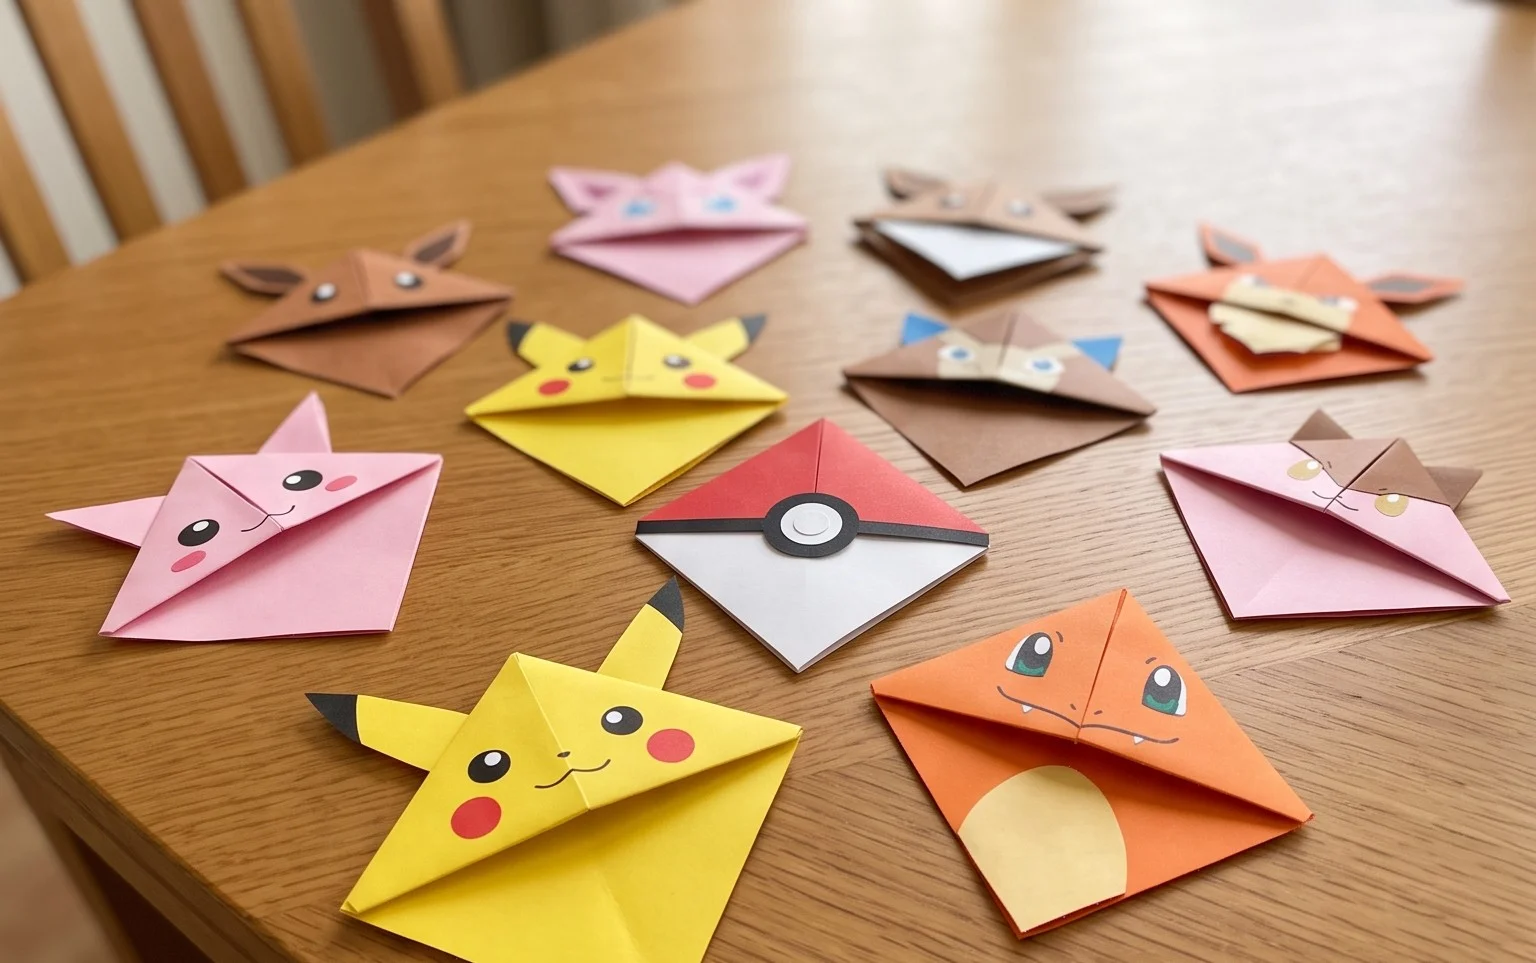
Welcome, crafty creators! Today, we’re diving into the exciting world of Pokémon and origami to make some super fun and easy bookmarks. These “marque-pages rigolos” (fun bookmarks) are perfect for keeping your place in your favourite books or even as little desk decorations. They’re simple enough for beginners but have that special Pokémon touch that everyone will love. Let’s get started on our paper adventure!
Choosing Your Paper Power
The right paper is your first step to origami success, especially when you want your Pokémon bookmarks to look their best. For this project, I highly recommend using standard origami paper.
Type and Weight:
Origami paper is specifically designed for folding. It’s thin enough to make crisp folds without becoming too bulky, but it’s also strong enough to hold its shape. You’ll want paper that’s around 70-80 gsm (grams per square meter). This is a common weight for origami paper and will give you a good balance of flexibility and sturdiness. Avoid using regular printer paper, as it’s often too thick and can make your folds messy, and it’s also prone to tearing. Cardstock is definitely too heavy for this particular model.
Size Matters:
For these Pokémon bookmarks, a square sheet of paper is essential. Standard origami paper usually comes in sizes like 15 cm x 15 cm (6 inches x 6 inches) or 20 cm x 20 cm (8 inches x 8 inches). I find that 15 cm x 15 cm is a great size for bookmarks – it’s manageable for detailed folds and fits nicely in most books. If you’re feeling adventurous, you can certainly try a larger size, but for your first few, stick with the smaller, standard size. If you only have rectangular paper, you can easily turn it into a square. Fold one corner down to meet the opposite edge, creating a triangle. Crease the excess rectangle, and then cut it off.
Single or Double-Sided?
This is where you can get creative! For a classic look, single-sided origami paper, where one side is coloured and the other is white, works wonderfully. The white side will become visible in certain parts of the fold, creating a nice contrast. However, for a bolder Pokémon look, double-sided origami paper is fantastic. This means both sides of the paper are coloured, or perhaps one side is a solid colour and the other has a subtle pattern. If you’re aiming for specific Pokémon colours, like Pikachu’s yellow or Charmander’s orange, double-sided paper can really enhance the visual appeal. You can even use patterned paper designed for origami – think tiny Poké Ball prints or subtle geometric designs that complement your Pokémon theme.
Mastering the Base Folds: The Foundation of Your Pokémon
Before we start folding our Pokémon, we need to get familiar with a couple of fundamental origami folds. Practicing these will make the entire process much smoother and ensure your final creation is neat and tidy.
The Valley Fold:
This is the most common fold. Imagine you’re folding the paper towards you, creating a “valley” in the crease. To make a clean valley fold, align the edges or corners precisely. Run your fingernail or a bone folder along the crease firmly from one end to the other. Precision here is key; even a slight misalignment can affect subsequent folds.
The Mountain Fold:
This is the opposite of a valley fold. You’re folding the paper away from you, creating a “mountain” peak. When instructed to make a mountain fold, you’ll often be folding along a crease that you’ve already made as a valley fold, or you’ll be instructed to fold a specific section behind another. Again, sharp creases are essential.
Making Folds Cleanly:
The secret to beautiful origami lies in precise and sharp creases.
- Align Perfectly: Always take the time to match edges and corners exactly before making a crease. Don’t rush this step.
- Crease Firmly: Once aligned, use your fingernail or a specialized origami tool (a bone folder) to press down firmly along the entire length of the fold. Work from the center outwards to ensure an even crease.
- Unfold Carefully: If you need to unfold a step, do so gently to avoid tearing the paper, especially if it’s thinner origami paper.
- Practice Makes Perfect: The more you fold, the better your creases will become. Don’t be discouraged if your first attempts aren’t perfectly sharp.
Your Pokémon Bookmark Folding Adventure: A Step-by-Step Guide
Now for the fun part! We’re going to create a simple, yet effective, Pokémon bookmark. This design is based on a classic origami bookmark fold, which we’ll then adapt.
Starting Point: Your Square Paper
Lay your square piece of paper flat on a table in front of you. Decide which side will be the “inside” of your Pokémon (usually the white or less prominent side) and which will be the “outside” (the main colour or pattern). For these instructions, I’ll assume you have the coloured side facing UP.
Step 1: The Diagonal Fold
Take the bottom-left corner of your square and bring it up to meet the top-right corner. Align these corners precisely. Crease firmly along the diagonal line that forms. Now, unfold the paper completely. You should have a diagonal crease running from the bottom-left to the top-right.
Step 2: The Other Diagonal Fold
Now, take the bottom-right corner and bring it up to meet the top-left corner. Align these corners perfectly and crease firmly along this new diagonal line. Unfold the paper again. You should now have two diagonal creases forming an “X” on your paper.
Step 3: Folding in Half
With the coloured side still facing up, fold the bottom edge of the paper up to meet the top edge. Align the edges carefully and crease firmly across the middle. Unfold the paper. You should now have a horizontal crease through the center.
Step 4: The First Corner Fold (Forming a Triangle Base)
This is where we start forming the pocket for our bookmark. Take the bottom-left corner of the paper. Bring this corner up to the point where the horizontal crease (from Step 3) meets the diagonal crease that runs from the bottom-right to the top-left. Align the corner point precisely with that intersection point. Crease firmly along the two new diagonal edges that are formed by this fold.
Step 5: The Second Corner Fold
Now, take the bottom-right corner of the paper. Bring this corner up to the point where the horizontal crease meets the other diagonal crease (the one running from bottom-left to top-right). Align this corner point precisely with that intersection. Crease firmly along the two new diagonal edges. You should now have a shape resembling a house with a pointed roof. The two flaps you just folded upwards form the base of our bookmark pocket.
Step 6: Folding Down the Top Flap
Look at the top point of your shape. You’ll see two layers of paper there. Take the very top layer of this point and fold it downwards, so the tip of this flap now rests on the horizontal crease you made earlier. Crease firmly across the fold.
Step 7: Folding Down the Other Top Flap
Now, take the second layer of paper at the top point (the one underneath the flap you just folded down). Fold this flap down as well, so its tip also rests on the horizontal crease. Crease firmly. At this stage, you should have two flaps folded down over the main body of the paper. These flaps help to secure the bookmark and give it a finished edge.
Step 8: Revealing Your Pokémon’s Face
Carefully open up the two flaps you just folded down in Steps 6 and 7. You’ll notice that the paper underneath has two pockets formed by your earlier folds (Steps 4 and 5).
Step 9: Securing the Pocket
This is the crucial step that turns it into a bookmark. Take the right-hand flap that you folded down in Step 7. Tuck the tip of this flap *into* the pocket created by the fold on the left side (from Step 4). You’re essentially tucking one flap into the other to create a secure pocket. Gently push it in until it’s snug. Make sure the edges align as neatly as possible.
Step 10: The Final Tuck
Now, take the left-hand flap (the one you folded down in Step 6). Tuck the tip of *this* flap into the pocket created by the fold on the right side (from Step 5). You’re tucking the remaining flap into the other side’s pocket. This locks everything into place and forms the complete bookmark pocket.
Congratulations! You’ve just folded a basic origami bookmark. The front of your paper should now have a pointed top and a pocket at the bottom.
Common Pitfalls and How to Avoid Them
Even with the clearest instructions, beginners can sometimes run into a few snags. Don’t worry, these are common, and with a little attention, you can easily overcome them.
1. Misaligned Corners and Edges:
* The Problem: This is by far the most common issue. If your corners aren’t perfectly aligned during the initial folds, your final shape will be lopsided, and the pockets won’t form correctly.
* How to Avoid It: Be patient! Before you make ANY crease, take a moment to ensure that the corners or edges you’re bringing together are precisely matched. Hold them in place with one hand and use your other hand to make the crease. Imagine you’re building something precise, not just scribbling on paper.
2. Squashed or Blurry Folds:
* The Problem: If your creases aren’t sharp, the paper can look messy, and the different sections of the fold might not lie flat against each other. This makes the final shape less defined.
* How to Avoid It: After aligning your paper, use the side of your fingernail or a bone folder to press down firmly along the entire length of the fold. Don’t just lightly run your finger. Work from the center of the fold outwards to push out any air and create a crisp, defined line.
3. Forgetting Which Flap Goes Where in the Final Tuck:
* The Problem: In steps 9 and 10, it’s easy to get confused about which flap tucks into which pocket. If you tuck them incorrectly, the bookmark won’t hold its shape or the pocket might be exposed.
* How to Avoid It: Refer back to the instructions carefully. The key is to tuck the flap you folded down *last* (e.g., the left flap in step 6) into the pocket formed by the fold you made *earlier* on the *opposite* side (e.g., the right pocket from step 5). Visualize it like closing a box lid – you’re securing one flap inside the other. If it doesn’t feel right, gently unfold and try again, paying close attention to which pocket is which.
Personalize Your Pokémon Pal!
Now that you’ve mastered the basic fold, let’s talk about making your Pokémon bookmarks truly unique.
Size Variations:
As mentioned earlier, you can absolutely use different sizes of square paper.
- Larger Paper: Using 20cm x 20cm paper will result in a larger, more prominent bookmark. This is great if you have thicker books or want a more substantial desk decoration.
- Smaller Paper: If you can find very small square paper (e.g., 7.5cm x 7.5cm), you can make tiny, adorable bookmarks perfect for pocket-sized notebooks or even as embellishments on cards.
Remember, the proportions of the folds will remain the same, but the overall size of your finished bookmark will change accordingly.
Paper Patterns and Colours:
This is where your creativity shines!
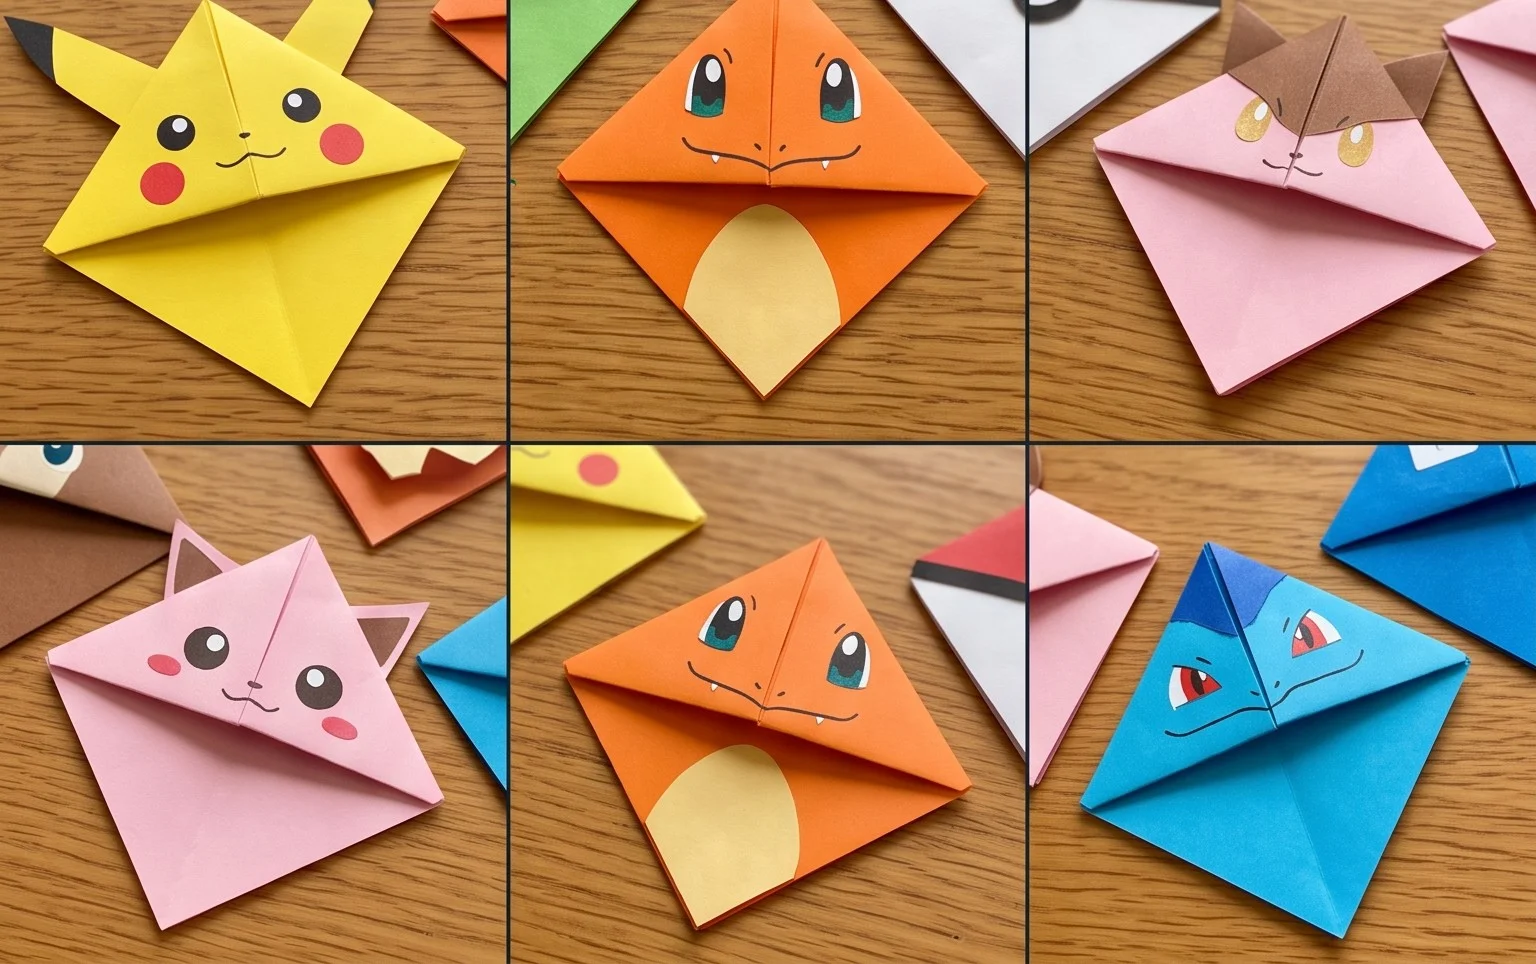
- Pokémon Colour Schemes: Think about your favourite Pokémon and choose paper colours that match their signature look. Pikachu? Yellow and black. Charmander? Orange and red. Squirtle? Blue and white. Bulbasaur? Green and pink.
- Character Faces: For a really fun touch, you can print small images of Pokémon faces onto sticker paper and then glue them onto the front of your completed bookmark. Or, you can draw them on with fine-tip markers!
- Themed Patterns: Look for origami paper with patterns related to Pokémon, like tiny Poké Balls, stars, or even abstract designs that evoke a sense of energy or magic.
- Gradients and Ombre: Papers with subtle colour gradients can create a beautiful effect, making your bookmark look like it’s glowing or has a unique aura.
Adding Details:
Once your bookmark is folded, you can add even more flair!
- Markers: Use fine-tip permanent markers to draw facial features (eyes, mouths, cheeks) onto your bookmark to bring it to life as a specific Pokémon.
- Stickers: Small Pokémon stickers can be the easiest way to add a character’s likeness.
- Washi Tape: Decorative washi tape can be used around the edges or to create patterns on the front.
- Googly Eyes: For a whimsical touch, carefully glue on tiny googly eyes!
Displaying and Gifting Your Pokémon Treasures
These handmade Pokémon bookmarks are more than just functional; they’re delightful little creations!
For Your Books:
Simply slide the open pocket of your finished bookmark over the top corner of a page. It will securely hold your place without damaging the paper. They look particularly charming peeking out of fantasy novels or manga.
Desk Decorations:
Stand them up on your desk! The folded shape often allows them to sit upright on their own, especially if you’ve made crisp folds. They add a pop of colour and personality to your workspace.
Gifting Ideas:
* Book Lover’s Delight: Pair a handmade Pokémon bookmark with a new book for a thoughtful and personalized gift.
* Party Favors: If you’re having a Pokémon-themed party, these make fantastic, inexpensive party favors for your guests to take home.
* Small Tokens of Appreciation: Give them to friends, family, or classmates who are fans of Pokémon or enjoy crafty items.
* Part of a Larger Craft Project: Use them as embellishments on handmade cards, gift tags, or even incorporate them into scrapbooking pages.
I hope you’ve had as much fun creating these Pokémon bookmarks as I do! They’re a wonderful way to combine two beloved hobbies, and the possibilities for customization are endless. Keep folding, keep creating, and may your reading adventures be ever more colourful!
Conclusion
Voilà ! Vous avez créé votre propre marque-page Pokémon ! Nous espérons que cette activité manuelle Pokémon vous a plu. N’ayez crainte si votre premier essai n’est pas parfait, c’est tout à fait normal et cela fait partie du plaisir de l’origami. Le plus important est de s’amuser en pliant le papier. N’hésitez pas à partager vos créations avec vos amis ou votre famille !
Pour aller plus loin, pourquoi ne pas essayer de réaliser votre marque-page Pokémon en différentes couleurs ou même d’ajouter de petits dessins dessus ? Explorez de nouvelles techniques et découvrez encore plus de projets créatifs en papier sur notre site !